Showing posts with label DIY Fashion. Show all posts

Friday, October 14, 2011

DIY: Turning Your Brooch Into A Stylish HeadBand


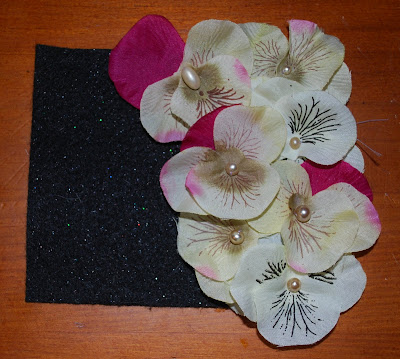
I broke this beautiful brooch months  ago. It was one of my favorites, so I kept it. I thought I could do something with it. Then I found these headbands in the dollar section at Target and I had the idea!

Alright, Let's Begin!

Items you will need:


Hot Glue Gun
Headband
Felt
Jewelry Cutter
Brooch
Scissors(not pictured)
Craft Glue(not pictured)

~~~~~~~~~~~~~~~~~~~~~~~~~~~~~


Using the jewelry cutter cut off any backing that is left on your brooch.

~~~~~~~~~~~~~~~~~~~~~~~~~~~~~~~~~~~~~~~~


Cut out a piece of felt that is twice the size of your brooch.

Using your craft glue, glue the brooch down onto the felt. Set for about 15 minutes.

~~~~~~~~~~~~~~~~~~~~~~~~~~~~~~~~~~~~~~~


Fold the felt over the headband, with the brooch on top. You will need now to find where you wish to attach the brooch on your headband.  Once you know exactly where you wish to place the brooch, glue the underside of the brooch and then attach it the headband.


Let the brooch set for 15 minutes.
~~~~~~~~~~~~~~~~~~~~~~~~~~~~~~~~~~~~~~~


Using your scissors cut off the excess felt.


Depending on your brooch shape, you may be able to get a close cut. If not, do not worry. When you have the headband on, no one notices the felt, they only notice the brooch.

~~~~~~~~~~~~~~~~~~~~~~~~~~~~~~~~~


Using your glue gun, glue down lines on the back of your brooch. This will help your headband stay in place when you are wearing it.

Let set overnight.

~~~~~~~~~~~~

Done!


Remember: Have Fun, Be Creative and Make it Your Own!

Let me know if you have any questions!

<3 Zerila

Tuesday, October 11, 2011

DIY: English Rose Inspired Ring Video

I have created another video!!

This time I made a video from the DIY I have already done, "The English Rose Inspired Ring".


Here is the Video:

What do you think? I think I did WAY better since the last video. Do you like the music?

This ring will also be this month's giveaway!

I know I already gave one away before, but I figured you guys wouldn't mind the chance to win it again.


I hope to eventually to have one video up a week. Most of them may not be DIYs but maybe tips or something else random that is going on with my life.

Who knows? What do you think I should do?

<3 Zerila

Friday, September 30, 2011

Diy: Button Ring Bracelet


I've always wanted one of these pieces. They are so punk and beautifully exotic. I finally decided to make my own.

I choose the two the silver and pink buttons because I wanted this to be a very neutral piece.

Anyway...

Let's begin.

Items you will need:


Jewelry Pliers
Two Buttons with Back attachments(i.e. no buttons with wholes)
Chain
Adjustable Ring
Jump Rings
Clasp Set
Craft Glue(Not Pictured)


Using the jewelry cutters, cut off the back to the button.


Put some glue down on the back of the button.

Using your jewelry pliers connect three jump rings. Place the jump rings on the back of the ring, as seen above, so that one jump ring is hanging off the button. That jump ring with be used to to connect to a chain.


Once you have the jump rings in place attach the adjustable ring. Make sure the jump ring is still handing out, as seen above.

Set aside and let dry. This will need to set over night, but it will be dry enough to attach to the bracelet.

~~~~~~~~~~~~~~~~~~~~~~~~~~


Measure out a chain that would fit around your wrist. At each end of the chain attach a jump ring and one part of the clasp.


Fold the bracelet in half and in the middle, using your jewelry pliers, detach the chain.  Attach a jump ring to each end and attach each jump ring to the button.


Measure out another chain that would run from your ring to your bracelet. Attach another jump ring to one of  the jump rings attached to the button, as seen above. Attach the chain that will run from your bracelet to ring.

The other end of the chain attach another jump ring and attach it to the jump ring on the adjustable ring.

Blah... so many rings!


Finished!!!!!


A very simple piece and of course you can use any colors you would like. Like I said I wanted a very neutral color scheme.

<3 Zerila


Sunday, September 25, 2011

Blogging Day 293: DIY Wrap Bracelet by Whitney Sews

I am a subscribe of Whitney Sews on YouTube and she did this awesome video on how to make a wrap bracelet:


This is what I ended up with:


I didn't have any leather rope so I used hemp rope I had, which works just as well. I also ran out of the  pink beads I was using,so I ended up finishing the bracelet with the metal beads. Instead of wrapping them I just knotted them on. I think the metal beads adds a nice touch. Don't you think?


This bracelet takes awhile to make. I suggest popping in a movie while you are making it. I ended up watching Thor, very cool movie, while I made mine. 


30 Day Song Challenge:

Day 17 - A song that you hear often on the radio

I actually like this song. Kelly Clarkson is my American Idol :)

<3 Zerila

Friday, September 23, 2011

Blogging Day 292: DIY: Turn Your Clip-On Earrings into Pierced Post Earrings

I love beautiful vintage earrings. Unfortunately,95% of the time, they are clip-on earrings. When I wear clip on earrings they always hurt and feel as if are trying to pierce my ears AGAIN.

After awhile I finally figured out I could convert them into pierced earrings.

Awhile, as in- I have a nice collection of clip-ons that I has been growing over the years and earlier this week I thought up this crazy idea.

I know (points to hair) blonde. It takes awhile to process ideas.

Let's begin!

What you will need:


Clip-on Earrings
Craft Glue
Jewelry Cutters
Posts and Backing

~~~~~~~~~~~~~~~~~~~~~~~~~~~

First Step:


Using your jewelry cutters, cut off the clip on your earrings.

~~~~~~~~~~~~~~~~~~~~~~~~~~~~~~~~~~~~

Last Step:


Glue the posts to the back of your earrings. Let set over night.

Done!!!


Very simple! Even I can do it!


30 Day Song Challenge:

My computer was lagging like crazy last night, and I was unable to post my song yesterday. So, here are two songs for you to enjoy today.

30 Day Song Challenge: Day 15 - A song that describes you.

Yes, I am crazy.
The video is even better because I found a Fullmetal Alchemist AMV .


30 Day Song Challenge: Day 16: A Song I used to love, but now hate

When this first came out I could not get enough of this song, but then they played it 24/7 and now it annoys me. I think it was a big deal because of Dawson's Creek.

 No, I did not watch Dawson's Creek... how dare you think that. Bad Reader! No cookies for you!


<3 Zerila

Wednesday, September 14, 2011

Blogging Day 282: DIY: Flower Tie On Ribbon Headband


This is a simple DIY for a beautiful tie on head band.

Items Needed:


Needle
Thread
Beads
Fake Flowers ( I got mine from the Dollar Store)
Ribbon
Felt ( mine is sparkly)
Glue Gun (not pictured)
Pins(not pictured)

~~~~~~~~~

Step 1


The length of the ribbon depends on your head. You basically need enough to wrap around your head and tie into a bow. Then length I needed was 62".... which is almost as long as I am tall. I wanted a lot of extra ribbon after I tied it on.


Cut a square piece of felt. How big depends on how big you wish your flower piece to be. I cut out a 4x4" and I honestly did not know what this headband looked like until I pieced it together.

~~~~~~~~~~~~~~~

Step 2:


There is not clear formula on how to put the flowers together. Put your first flower down and using your needle and thread, attach it to the felt. Sew the bead in the middle to secure the flower and then move onto the next flower.


The sewing does not need to be perfect. As you can see I'm all over the place.

~~~~~~~~~~~~~

Step 3:


Once you have all the flowers you desire on your felt turn it over and attach the ribbon. You will want to first figure out where you want your ribbon to lie. Test the placement out by pinning the ribbon to the felt and in front of the mirror tie on the headband and adjust accordingly.


Once you have found the perfect place, loosely sew the ribbon to the felt.

~~~~~~~~~~

Step 4:


Any excess felt you have at this point fold over onto of the back of your piece.


Any pieces sticking out in the front, cut off.


Using your glue gun, glue the excess to the back of your piece. If you do not have any excess, cut out a similar shape of felt as your piece and glue together. This way it will protect your stitches, secure the ribbon and look nice.

~~~~~~~~~~~~
Step 5 (Optional):

I could never stand tie on headbands because they would always move and securing them with bobby pins did not help! Here is a little tip that helps A LOT to keep your head bands in place.


Using your glue gun, glue down lines of glue on the back of your flower piece and let dry. The texture of the glue will help keep the hair band in place. I tried this out on this head for the first time. I wore it to work and did not have to adjust the piece at all. You can also add glue throughout the ribbon to help keep that in place as well, but since I used a lace ribbon I did not try that out. Maybe next time.

~~~~~~

All Done!


Just a few simple items to make an elegant headband.


I wore this to work and got tons of compliments. I tend to try out my DIYs on my co-workers, they help with feed back.


Enjoy! Remember: Have Fun, Don't Stress, and Make it Your Own!


30 Day Song Challenge: Day 11 - A song from your favorite group.
2NE1 Of course!!!!!

I choose this song, because I think this is one of the only songs I have not yet posted on this blog! 2NE1 Rocks!


<3 Zerila

Monday, September 12, 2011

Blogging Day 280: My Very First DIY YouTube Video

I have been working on this video all weekend long! I did not realize how much work goes into a simple 10 minute video!!!!

 
Now for the unfolding!

Presenting Zerila's first DIY YouTube Video:

 
YEAH!!!!!
I'm so proud of my little video!

I hope you enjoyed it!

<3 Zerila

Since I know I'm behind in posting my 30 Day Song Challenge, here are the videos to catch you up:

 
‎30 Day Song Challenge: Day 04 A Song That Makes You Sad:

It takes ten seconds and I'm in tears.

0
 

30 Day Song Challenge: Day 05 - A song that reminds you of someone

My high school sweet heart, he was a sweet guy and this was my sappy song to him.

Day 06 - A song that reminds you of somewhere
I was born in Scotland and then later my father was stationed there for a tour when I was in second to fifth grade. I have yet to see a land more beautiful then Scotland and doubt I ever will.

 
Day 07 - A song that reminds you of a certain event
When I was in college ,the first social I planned for the BCM was a pizza party and we watched Veggie Tales. It was awesome!


‎30 Day Song Challenge: Day 08 A song that you know all the words to.

A beautiful song I used to torture my parents with.


‎30 Day Song Challenge: Day 09 A song that you can dance too.

I've been practicing there moves. It's hard not to be addicated to this song.

Tuesday, August 16, 2011

Blogging Day 255: Recycled Paper Bead Necklace

I was looking around YouTube the other day for an awesome DIY to do and this is the awesome video that I found :


This is the necklace I came up with:


I think for my first time I did a pretty good job! I need to find a better glue then hot glue for paper. Any suggestions?

Either way, you guys definitely have to try this out! It was a lot of fun and super cheap! I got a lot of good complements at work!

Have fun!

<3 Zerila

Wednesday, July 27, 2011

Blogging Day 236: T-Shirt Pillow


I just had to show you this cute t-shirt pillow my fellow co-worker Sedusa made!

Another co-worker asked her to make a pillow using this t-shirt.So she literally took the t-shirt and attached it to a pillow she made.

This is what the back looks like:


On the top corners she folded them down and added some cute buttons.


Then on Princess Tatiana's glove she added a little flower.


I think this pillow is absolutely cute! As soon as I find a t-shirt I will do a DIY. Sedusa has given me permission to steal her design :D


<3 Zerila

Friday, July 22, 2011

Blogging Day 232: Ladybug Bobby Pins DIY


This is a simple DIY.  I made them from fun buttons I found at Michael's.

Let's begin!

Things you will need:


Fun Buttons
Two Bobby Pins with Pads ( A friend bought them @ Hobby Lobby, but you can buy them on Ebay)
Jewelry Cutters
Glue

A friend let meuse this new glue she found. I tested them on my flat back gems to see if the glue makes them crackle.


I tested them on three different gems, and it looks like this glue crackles them too. Oh, well, the search continues.

Anyway... back to business.


Using the jewelry cutters, cut off the button backing.

Then, using your glue, glue down the buttons on the pads of the bobby pins.

Let set overnight.

FINISHED!!!!


THAT SIMPLE!!!!!!


Stay cool everyone! When I got to work @ 8:30 this morning it was 100 degrees. Stay cool and stay hydrated .

<3 Zerila
Workout: To hot to workout today!
Water: Not enough because of the heat today.
Veggies: Only 3 servings.


Journal With Me 9/19/20

  Journal - Santa Gave it to Me :) Wood Background  Background Paper: Craft Smart, Cedar Lodge Paper Pad, Michaels Fiskars Paper-cutter: JOA...