
The Hair Cuttery that I go to has these pens that have flowers on top and I always wanted to make one for myself. At my recent trip to the dollar store I ran across the flower arranging tape they use to create the pens, so I decided it was high time I make some flower pens of my own. Of course, I couldn't just stop at just attaching a flower to my pen. I had to embellish them to "Princess Zerila Bling- Bling" status.
Let's begin!
Here are the items you are going to need:

1. Artificial Flowers
2. Glue Gun & Glue Sticks
3. Craft String of Pearls with Flat Backs
4. Scissors
5. Pens
6. Black Permanent Marker
7. Flower Arranging Green Tape ( the tape has the stickiness of a post-it note)
8. Embellishments- I used sequins and flat back gems.
First Step:
Choose the flower you wish to use and cut the flower off leaving one inch of stem to work with. Remove as many leaves as you wish to use for your pen and place them underneath the flower. Once you have arranged how you want your flower and leaves to look, using the green tape, secure them together. Do not cut off tape!


~~~~~~~~~~~~~~~~~~~~~~~~~~~~~~~~~~~~~~~~~~~~~~~~~~~~~~
Step 2: Attach the flower to the pen
Place your flower next to the top of the pen and begin wrapping til flower is secure.

~~~~~~~~~~~~~~~~~~~~~~~~~~~~~~~~~~~~~~~~~~~
Step 3: Wrapping the Pen
Once the flower is secure, being wrapping the tape up til you cover the top of the pen and no plastic stem is showing. Then begin working your way down the pen.

~~~~~~~~~~~~~~~~~~~~~~~~~~~~~~~~~~~~~~~~~~~~
Step 4: Glue the End Down
Once you have wrapped the pen, put a little glue on the end and hold it down for a few seconds. Once secure, you have finished the basic making of your flower pen.

~~~~~~~~~~~~~~~~~~~~~~~~~~~~~~~~~~~~~~~~~~~~~~~~~~~~~~~~~~~~~~~~~~
The next steps are different ways I have decorated the pens.
Pen#1
For this pen I added three round clear flat back gems at the top, on each side of the pen.

Then for the top I glued on more round gems and for the center glued on a star gem

~~~~~~~~~~~~~~~~~~~~~~~~~~~~~~~~~~~~~~~~~~~~~~~~
Pen # 2
This time I added black sequins to the side.

Then at the glued on more sequins and glued on a black sequin for the middle.

~~~~~~~~~~~~~~~~~~~~~~~~~~~~~~~~~~~~~~~~~~~~~
Pen #3 (My favorite)
This one is a bit tricky. First , using the black permanent marker, you would need to draw a line that swirls around the pen starting from the top and continues swirling down to the bottom.

Next, using the hot glue gun, glue on the sequins(I used clear) to cover up the black line.

Next I the glued on sequins around the petals of the flower, which cause the petals to drop down.


In the center I glued a big clear gem.


~~~~~~~~~~~~~~~~~~~~~~~~~~~~~~~~~~~~~~~~~~
Pencil
I realized that for a pencil, you can not do the whole pencil, but this is what I did.
After securing the pencil, I wrapped only two inches.

I decided to wrap the pencil with pearls since I could only do two inches.
When wrapping the pearls, I only glued down the first wrap. As long as the ends are secure, the pearls will not unravel.


Once I wrapped to the top, I glued down the last turn.
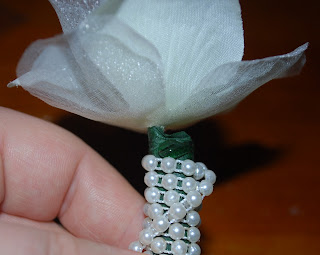

I noticed I could not properly wrap of the pencil. There was this tiny spec of green that I did not like.

So, I cut off three pearls from the string and glued them on the top.


I didn't do anything to the flower on top, but this is what it looks like.

Of course these are just samples of how you could decorate your pen/pencil. This is more of a guide of what you can do.
Have fun! Remember: Be creative, Be Imaginative and Make it your own!
Veggie/ Water Update: I did not watch my waters today. I can imaging I did not drink enough today, but I did drink 3 or 4 glasses. Veggies of course, I have down pat. It's just at times I forget to drink the stupid water!!!
<3 Zerila


No comments:
Post a Comment